Group curators

Akiba
- @Freaklabs
- | He/Him
Freaklabs

Jacinta Plucinski
Freaklabs
Ready to put your Tech Tutors skills into practice? WILDLABS and Freaklabs are proud to announce our new virtual course: Build Your Own Data Logger. This eight-part video tutorial series will guide wildlife and conservation researchers through building and deploying custom hardware using the Arduino platform. To join, Register now!
This course is free to all, but if you would like to build along with the course in real-time, you can purchase the WildLogger board and kit for $30 (USD) here
About the Series
If our first season of Tech Tutors inspired you to put your conservation tech skills to the test, we've got a brand-new experience coming to WILDLABS! Where can you start learning how to use Arduino to build custom devices for wildlife and conservation research? Right here!
Beginning this November, WILDLABS and Freaklabs are proud to introduce an eight-part video tutorial series that guides wildlife and conservation researchers through building and deploying custom hardware using the Arduino platform. The series will use WildLogger - an Arduino-based board that’s designed for deployment - to create a custom data logger.
Are you new to Arduino, or maybe not entirely sure what Arduino is? Good news - this series is for beginners like you! By the end of our eight modules, you'll have the practical skills and knowledge base you need to deploy your creation for real.
The series assumes no hardware experience. It’ll cover common terminology, components, the hardware design stack, setting up the Arduino environment, programming and optimising your application, choosing and modifying enclosures, piloting, testing, deploying and troubleshooting.
You’re not on your own. Our interactive series makes it easier than ever to get feedback and guidance as you learn. Every two weeks, we’ll host a live Office Hours event to troubleshoot, answer questions in person, and release the next module in the series. We'll also have cheat sheets and code to download, plus a forum to ask questions between sessions. And of course, you can build along with the course in real-time with the WildLogger board and kit, available here.
The tutorial is free and allows you to move at your own pace with videos available to all on the WILDLABS Youtube channel. To navigate through all course content, visit the Course Directory.
To join this virtual course, register here!
Group curators
- @Freaklabs
- | He/Him
Freaklabs
I'm an engineer and product designer working on wildlife conservation technology.


- 0 Resources
- 302 Discussions
- 20 Groups
Freaklabs
Develops open source technology for wildlife and conservation researchers

- 0 Resources
- 11 Discussions
- 2 Groups

- @Durgananda
- | He
- 0 Resources
- 0 Discussions
- 20 Groups

Natural Solutions
- 0 Resources
- 13 Discussions
- 10 Groups

- @KeesteVelde
- | He/Him
Underwater Bioacoustician interested in developing PAM for freshwater systems

- 0 Resources
- 6 Discussions
- 7 Groups

Tech for Conservation

- 0 Resources
- 2 Discussions
- 13 Groups

- @Valentin_Stefan
- | He/Him
Interested in emerging technologies related to camera traps for pollinators
- 0 Resources
- 4 Discussions
- 18 Groups
Interested in bioacoustics
- 0 Resources
- 0 Discussions
- 14 Groups
- 0 Resources
- 0 Discussions
- 1 Groups
- @kenadyWilson
- | she/her
- 0 Resources
- 0 Discussions
- 8 Groups
Biodiversidata
Uruguayan biologist working in macroecology, biodiversity informatics and environmental education
- 0 Resources
- 0 Discussions
- 1 Groups
- 0 Resources
- 0 Discussions
- 4 Groups

GreenLab

- 0 Resources
- 20 Discussions
- 8 Groups

- @MattyD797
- | He/Him
PhD Student | Cornell University | Smithsonian Institution; My focus is in computational ecology within fishery acoustics
- 0 Resources
- 16 Discussions
- 12 Groups
Careers
MS and PhD Opportunities in Ocean Engineering and Oceanography

Camille Pagniello
The Marine Innovation Lab for Leading-edge Oceanography develops hardware and software to expand the ocean observing network and for the sustainable management of natural resources. For Fall 2025, we are actively...
6 October 2024
Article

Can conservation-based incentives promote the willingness of local communities to coexist with wildlife? A case of Burunge Wildlife Management Area, Northern Tanzania
10 July 2024
Article
Manufacturing Partnership Brings Low-Cost Pipistrelle Family of Detectors to Researchers, Ecologists and Bat Enthusiasts Around the World
2 July 2024
Article
New WILDLABS Funding & Finance group

Frank van der Most
WildLabs will soon launch a 'Funding and Finance' group. What would be your wish list for such a group? Would you be interested in co-managing or otherwise helping out?
5 June 2024
Article
The Inventory User Guide

Jake Burton
Read in detail about how to use The Inventory, our new living directory of conservation technology tools, organisations, and R&D projects.
1 May 2024
Article
Introducing The Inventory!

Jake Burton
The Inventory is your one-stop shop for conservation technology tools, organisations, and R&D projects. Start contributing to it now!
1 May 2024
Careers
The primary focus of the research is to explore how red deer movements, space use, habitat selection and foraging behaviour change during the wolf recolonization process.
10 February 2024
Link

A secure platform designed for those working to monitor & protect natural resources. Insight facilitates sharing experience, knowledge & tools to increase efficiency & effectiveness in conservation. By...
7 November 2023
Careers
Mobile App. Developer / Gibbon Research

Kyle Winney
Can you create an ecological data collection application on Android for Gibbon and Biodiversity Research. Check out this opportunity with us!
24 August 2023
Careers

We are recruiting a graduate student to work on a 3D groundwater flow sensor in collaboration with USGS. Experience with C/C++ or similar programming languages is preferred, but not required.
12 July 2023
Careers
Postdoc for electrical engineering at NASA
Roland Kays
Spaceborne Satellite-tag RF Systems to Measure Spatiotemporal Patterns of Wildlife
12 July 2023
Careers
Wildlife Monitoring Engineer
Tom August
Permanent and Full Time role at the UK Centre for Ecology & Hydrology
8 June 2023
June 2025

event
Nalini
November 2023

| Description | Activity | Replies | Groups | Updated |
|---|---|---|---|---|
| No air in the vessel. Hydraulic pressure testing is just that because any vessel failure does not cause explosive release of gas and possibly vessel fragments as a result. ... |
|
Build Your Own Data Logger Community | 2 weeks 2 days ago | |
| Hi, we've gotten more than 20 replies until now so thank you if you took the time to answer.And we would really appreciate if you could spare a few minutes to answer if you haven'... |
|
Emerging Tech, Animal Movement, Build Your Own Data Logger Community | 1 month 1 week ago | |
| I have now built my fox and cat trap.I want to triger it by face reconition so not to get possums or goanners.Can you help ?Doug Hemingway.0418 390 701 |
|
Acoustics, Build Your Own Data Logger Community | 2 months 1 week ago | |
| Hi Dan, Not right now but I can envision many uses. A key problem in RS is data streams for validation and training of ML models, its really not yet a solved problem. Any... |
|
Emerging Tech, AI for Conservation, Animal Movement, Build Your Own Data Logger Community, Camera Traps, Connectivity, Conservation Tech Training and Education, Data management and processing tools, Geospatial, Sensors | 3 months ago | |
| Thanks! I am familiar with EarthRanger but wasn't aware it could be used for behavioural data collection |
+6
|
Build Your Own Data Logger Community, Data management and processing tools, Open Source Solutions | 3 months 2 weeks ago | |
| Hello everyone,I built Brave Puffin (https://bravepuffin.com) - a small, autonomous, long range, solar powered boat. It is designed to... |
|
Build Your Own Data Logger Community, Marine Conservation, Sensors | 5 months ago | |
| Steve and I are looking to develop a low-cost benthic drift camera with a live video feed. Our hope is to use an acoustic modem to give us a low quality feed for navigation /... |
|
Marine Conservation, Build Your Own Data Logger Community, Connectivity, Emerging Tech, Open Source Solutions | 5 months ago | |
| @BrettMargoSupplies @Rob_Appleby @StephODonnell HI all,sorry for falling off the chat so suddenly and for so long. I really appreciate all your comments, suggestions and... |
+7
|
Build Your Own Data Logger Community | 6 months 3 weeks ago | |
| Hi Brett, I am interested in developing really low cost multi channel underwater acoustic recorders. Can you tell me a bit more about the board and stuff you were using... |
|
Build Your Own Data Logger Community, Acoustics, Camera Traps, Climate Change, East Africa Community, Marine Conservation, Open Source Solutions, Protected Area Management Tools | 7 months ago | |
| Hey Xavier! Thank you for your interest and question!! The overarching goal of the FinDrop v1 for the WildLabs award is to characterize an instrument and make it as, if... |
|
Acoustics, Build Your Own Data Logger Community, Marine Conservation, Protected Area Management Tools, Sustainable Fishing Challenges | 8 months 3 weeks ago | |
| Thanks both for the replies and apologies for my tardy response. It seems this is not straightforward problem which is a shame as something which could do this would be very handy... |
|
Build Your Own Data Logger Community, Citizen Science | 11 months 1 week ago | |
| Fantastic!! |
|
Acoustics, AI for Conservation, Animal Movement, Build Your Own Data Logger Community, Community Base, Early Career, Ethics of Conservation Tech, Marine Conservation, Open Source Solutions | 11 months 2 weeks ago |


Battery status monitoring no longer working
24 February 2021 10:13pm
3 March 2021 9:33pm
Hi Akiba,
Please see the email sent to sales@freaklabsstore.com.
Many thanks for your assistance.
Phil Young

8 March 2021 4:28am
Hi Phil.
A replacement board was just sent out to you. Thanks for your help with the pictures and the patience :)
Akiba
Hackaday Data Logging Contest

4 March 2021 1:28am
Module 4: Tying It All Together
11 February 2021 12:00am
WildLogger Add-On Board Requests
4 February 2021 2:10pm

5 February 2021 6:28am
Hi Akiba,
Yes, the TSL2591 has an interrupt pin and there are also a couple of example applications in the Adafruit and TSL2591MI libraries. I am doing tests making the connections with Dupont cables in the I2C connector of the Wildlogger, and for the interruption I will use the corresponding pin of the PIR connector
The connections do not concern me since, once the prototype has been tested and defined, my idea would be to make the maximum of welded connections to avoid failures
I'm still in the design phase, I already have the hardware quite defined, and now I have to enter with the most difficult part, the software, which for me is where I have the most difficulty
I have been gathering the elements to prepare the cake, and now is the time to enter the kitchen, I will not deny that I am excited and terrified at the same time
I'm already telling you ...
Regards !
5 February 2021 9:05am
Hi JAL.
Excellent! I'm glad you've already started on it and Dupont wires should be no problem. Let us know how it goes and if you have software issues, feel free to post them in this forum. Good luck and please take pictures of the modified Wildlogger and also the deployment. It sounds like an amazing application!
Akiba
5 February 2021 12:35pm
I appreciate your encouragement !
Don't hesitate that I will keep you informed of the progress that I am making
Happy weekend !
Carly's video blog journey

22 January 2021 9:50pm
23 January 2021 6:16am
Hi Carly.
The videos are wonderful! They're hilarious and also let me know areas we can improve on :)
Akiba

4 February 2021 2:42pm
Module 3.3: Measuring Battery Status
21 January 2021 11:54am
4 February 2021 5:00am
Hi JAL.
I'm glad you're enjoying the WildLogger! What you're doing fits exactly the purpose of this course. It's demystifying the art of customizing research equipment. For the WildLogger, if you will be using it to collect scientific grade data, I recommend to upgrade the board to use an external analog reference. There's already a footprint and we will add that to the shop this week. It's a cheap part but will stabilize the ADC reference vs temperature and also has 0.1% accuracy so that you will get more accurate ADC readings across temperature. I think we're targeting $1 for that part so it's a cheap upgrade. Currently the power supply is used as the ADC reference to keep costs down which is accurate to around +/-1.5%.
In regards to the power supply and power requirements, the battery input needs to have a voltage of between 3.6V and 5.0V. A single cell lithium-ion or lithium-ion-polymer battery would be fine at a nominal voltage of 3.6V and full voltage of 4.2V.
in sleep mode with an average SD card that implements power savings modes (like SanDisk), it consumes around 0.8 mA. If you're calculating battery life, you can use that as a theoretical maximum battery life, ie: if you use a 2000 mAHr battery, you would get 2500 hour battery life or ~100 days max. We usually divide by 2 or 3 to get a realistic battery life.
We'll also be making some bonus sensors and training materials specifically for the WildLogger so people can extend it to different applications. We'll announce that soon, likely once we're caught up on the video creation. Also do let us know if you have requests for sensors, displays, etc.
Hope that helps and let me know if you have any other questions.
Akiba
4 February 2021 6:34am
Hi Akiba,
Oh, your answer is great!
My idea is to build a DL that allows,
- Light registration, with time stamp, when it exceeds a certain threshold (To control the human presence in the cave) The card only has to record when this threshold is exceeded to save energy
- Periodic record of temperature and humidity
- Data recording on SD
- Autonomy of at least 4 months
I have tried some sensors and I think I will use the TSL2591 because it has a very low detection threshold (0.18 uLux) and has an interrupt pin. I've already been testing some sample libraries, and I think it would be ideal
For temperature and humidity I am hesitating between using the DHT11 or the BME280
Perfect the external reference of the ADC if it serves to have more accurate readings
My idea is to use a power bank with 3 or 4 18650 Lipo batteries and built-in BCP, and to be able to disconnect the device when it detects that the power supply is less than 3.2V
Is the Sandisk card you mention a normal one, or of an industrial type like the one you presented in the corresponding module?
My best wishes,
4 February 2021 1:13pm
Oh that sounds like a fascinating application. I've actually just started a thread for Wildlogger add-on board requests. The TSL25911 sounds do-able and also it looks like one useful thing would be to put together some adapter cables to other popular modular systems like the Adafruit Stemma and Seeed Grove. Let's discuss this in the other thread.
Module 3.2b Command Temp and Humidity
3 February 2021 5:34am

3 February 2021 6:44am
Hey,
In the cmdTemperature and cmdHumidity functions, there's full stops between void and cmdTemperature and cmdHumidity. Can you try removing them and see if that works?
Cheers
Jacinta
3 February 2021 10:18am
Omg thank you. Just flew over my head
4 February 2021 12:21am
No probs. We've all been there (and will be there again)!
Glad it's working
cheers
Jacinta
Module 3.4: Real Time Clock
21 January 2021 12:28pm
2 February 2021 2:30am
Hi JAL.
For Module 3.4 - Lab 4a, the time will be hard coded into the sketch and then it will just print that time out. It's just to demonstrate how you would set it and how you would print it out. Every time you reset the board, the same time is reprogrammed into the real time clock so it will never advance.
Where you will see the actual real time clock behavior is in Module 3.4 - Lab 4b where you set the clock from the command line and can read it from the command line. Since it won't be hard coded but rather set at run-time, and then independently read out, you should see the clock advance. Also you should only need to set the clock once as long as the backup battery holds up (should be good for a few months to years).
Please try lab 4b and check if the clock can advance. You should see the seconds incrementing at least.
Akiba
2 February 2021 11:57am
Hi Akiba!
Now it's okay, and the clock is ticking!
Now I understand the errors I made, I had used the example of the Rtc_Pcf8563 "Setclock" library that contains in the Setup an "rtc.initclock" statement, with which every time you restart the program the clock starts counting from the starting point of departure.
Your first example did not set the clock either, and it only served to enter a time and print it later.
I had also tried to use the Rtc by Makuna library to automatically synchronize the time of the PC with that of the RTC, but I got a time loss error, as if, for some reason, the RTC did not retain the time. It is true that this library is designed for other RTC models of the DS **** series, and surely the error comes for that reason
Do you know if there is a library to fulfill this function with your RTC?
Thank you !!
2 February 2021 3:33pm
You'll need to write a software application that would communicate from the PC to the board via serial. Within that software application, you could send the time and date to the Wildlogger application, ie: through the command line interface. This would automate the synchronization.
Akiba
BYO Data Logger: Live Events - Tell us what you want to discuss!
29 January 2021 1:57pm
Module 3.6: Interrupts
29 January 2021 12:29pm
Module 3.6: Interrupts
29 January 2021 12:00am
Module 3.5: SD Cards and the FAT File System
22 January 2021 5:30pm
27 January 2021 3:05pm
Hi JAL.
Ah I understand now. When we put the libraries in github, we were still debating on what versions we would use. For the RTC library, we initially wanted to use the library available from Arduino Library Manager, but it didn't support the Timer feature and datetime function (it just supported date and time separately). We ended up using a fork of the RTC library with the additional features.
Also there are so many different versions of sdFat and as you saw, one version is incompatible with another. We were using v1.01 at that time which we've field tested and worked well. However after a lot of thought, we finally decided to use the last version of Release 1 which is v1.1.4 .Unfortunately the github libraries didn't get updated. Actually we didn't think anyone would use them and would install the libraries as per the videos. The Github libraries were intended for archival purposes. I'm glad you caught the version mismatch though.
It's actually a good example of one of the painful parts of embedded programming. Getting the right combination of library versions, application code, and hardware so they are all communicating happily together and doing what you want can be quite challenging and frustrating. That's why when we discussed with Steph and Ellie, we liked the idea of doing a deep course, but also wanted to make sure there were a lot of avenues of support. Otherwise, there are so many hidden walls to run into.
Also the github libs have been updated, but I'm glad you got it all to work anyways.
Akiba
28 January 2021 6:37am
Too many things to consider! :-)
This is one of the reasons why I try to work with VsCode, that this IDE allows to save each project with its library versions
But I still have other problems that I do not understand ..., we will continue to insist
The great advantage of this course is your professional support, without it we would be lost!
Best regards !
28 January 2021 7:20am
Ha ha ha. We'll look into PlatformIO perhaps in the future, once we have a break with the courses. In the meantime, there's a lot of other hardware, sensors, and communications to play with still :)
Akiba
BYO Datalogger Github Repository
17 December 2020 1:42am
26 January 2021 6:19pm
Hi Akiba,
I am using VsCode and I see that your board is not included in the list of available
What similar board do you think I could use? Do you foresee that your plate will be included in the near future?
Cheers !
26 January 2021 11:35pm
Hi JAL.
I think everyone should use the editor they feel comfortable with, but our courses will assume using the default Arduino IDE. There is a setting where you can use the Arduino IDE just to compile and use an external editor. I recommend possibly using this mode so you can use the included board files we've prepared. We stray a bit outside the standard Arduino ecosystem since we are designing boards specifically for field deployment. We are actually using larger chips with more RAM so our board files are different than the standard included ones.
Akiba
27 January 2021 9:18am
It is true Akiba, I did not remember this option, that the Arduino IDE allows us to work with an external editor
I will also try to send a message to the Platformio managers to include your board in that environment
Thanks !
Module 3.2: Temperature and Humidity Settings
21 January 2021 11:43am
24 January 2021 4:46am
An observation I made when first experimenting with DHT22 modules with a Raspberry Pi years ago that still seems true with Arduino and DHT11 sensors. The first reading of the temperature and humidity always seems to be inaccurate for some reason, so my habit was to always read and throw away the first command as part of the device setup.
e.g.
28.10,49.00 <-- inaccurate
29.60,46.00
29.60,46.00
29.60,46.00
29.70,46.00
29.70,46.00
John
Module 3.5: SD Cards and the FAT File System
22 January 2021 12:00am
Course Directory
21 January 2021 12:00am
Module 3.4: Real Time Clock
21 January 2021 12:00am
Module 3.3: Measuring Battery Status
15 January 2021 12:00am
Module 3.2: Temperature and Humidity Settings
8 January 2021 12:00am
Module 2: Setting up the Arduino IDE
24 November 2020 12:41pm
7 January 2021 5:14pm
Thanks Akiba. I re-installed the driver and that seems to have helped. I appreciate the support.
Jeff
7 January 2021 6:08pm
Oh great. That makes me feel better also. Hope you have a stable development system to work off of. Great things still need to be made!
Akiba
7 January 2021 7:39pm
@Jeffm Oh that's great to hear. We've had a couple of cable issues so far, but I'm really glad you got the problem sorted. Onward and upward!
Akiba
BYO Holiday Break Project Log + Schedule Update
22 December 2020 10:05pm
2 January 2021 12:17am
Happy 2021 Robin!
We hear you. The holiday season was brutal for Jacinta and I. We're just getting back into the swing of things now and resuming the video production. Looking forward to (hopefully) a better 2021 :)
Akiba

5 January 2021 2:13pm
Just set the RTC. Thanks for the update ;-)
5 January 2021 3:09pm
Ha ha ha. it will be much more important than that later on.
Stay tuned :)
Akiba
USB dongle

7 December 2020 10:13pm

8 December 2020 10:14am
Oh, I understand now. Thanks for the clarification.
Roy
4 January 2021 4:55pm
How do you get the cables through the white plastic sticking out bit? Mine seem to be too wide to fit through
4 January 2021 5:19pm
Hi Liam.
To get the cables through the cable gland, we'll need to remove the wires from the terminal housing and then reinstall them. That will be in a later module.
Akiba
Module 3.3.3 why is pinBatt an int?
23 December 2020 2:42pm
28 December 2020 2:57pm
Hi Akiba, Jacinta,
Jjust to say I've complted all the videos through to end of 3.3.1b successfully - no problems! It snowed here in the North of England last night, so was measuring temperature today!
Many thanks
Rob
4 January 2021 9:49am
Thank you very much - that is very helpful. Knew there had to be a logical explanation behind it.
4 January 2021 9:50am
Thank you, that's very helpful. Nice to see it is a shortcut.
Useful Resources (add your own!)
11 November 2020 10:56am

25 November 2020 11:12am
Ed Mallon (Cave Pearl Project) is exceptionally complete in regards to temperature measurement. Not as easy as it seems!
Excellent links!

8 December 2020 12:28pm
Hi Everyone.
Just thought I'd add this to the list, as I have found it very useful.
Practical Electronics for Inventors by Paul Scherz and Simon Monk. (ISBN 978-1-25-958754-2)
It does the "high level" stuff and the detailed stuff very well and covers a lot of the devices and functions you may think of using in a project.
Cheers
Sean
1 January 2021 11:53am
Hi everyone,
while beeing separated from my Wildlogger board I still had to play with some sensors ;-)
Ceck out this wonderful project: https://sensebox.de/en/
Great to learn coding with this nice blockly interface:
https://blockly.sensebox.de/ardublockly/?board=sensebox-mcu&lang=en#
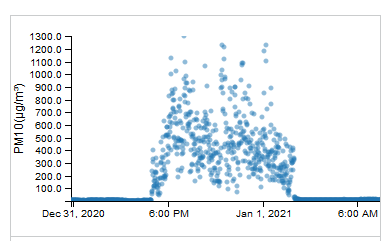
I had lots of fun monitoring the particulate matter influx from the illegal fireworks ;-)
Greetings from Austria,
Robin
Module 3.1: Programming Basic Functionality
1 January 2021 12:00am
Module 4 and 5
22 December 2020 9:09pm

22 December 2020 9:59pm
Hi there! Yes, we're in the process of working out the new schedule - several of the modules have ended up being longer and more in-depth than we originally expected, so we've postponed them until after the holiday break to give everyone a chance to catch up on the first part Module 3. You can expect the second half of Module 3 after the New Year, and Module 4's release announcement will come soon after that.
Sorry for the confusion, hope this helps!
-Ellie
Module 3.1.1 The Arduino Command Line.
21 December 2020 7:06pm
21 December 2020 11:29pm
Hmm.. that's strange.
I copied and tested your code (as above), and it works as expected. I get the 'command not recognised' initially, and then 'hello command line' when I type in hello.
At the bottom of the serial monitor, can you check it's set to 'carriage return' and 57600 baud (see images below)?
After the serial monitor is open, the output will be blank.
If you put your cursor in the text input field, and press enter, it should return ''Cmd: Command Not Recognised".
If you put your cursor in the text input field and type 'hello', it should still return the 'hello command line' as per the function.
I've attached screenshots of the two scenarios above.
Can you share what you're typing into the serial console, and what's being returned?
thanks
Jacinta


22 December 2020 10:48am
thanks jacinta. it worked again. The problem was I couldnt exactly see How yall set up the serial monito in the video, because all the links to future videos actually covered the bottom that showed that part. Sorry about that.

22 December 2020 11:09am
Oh! Okay that's good to know, we'll move the links.
Code Module 3-3-3b
21 December 2020 7:22pm
21 December 2020 9:34pm
Hey Paul,
The #include macro, #define constants and pinBatt variable declaration need to sit outside the setup function at the very top.
Declaring pinBatt outside of the setup loop, means it becomes a global variable which can be accessed by any function in the program.
So, currently what's in the first loop function, should be in the set up function, and there should be only one loop function.
So code should look like ...
#include <cmdArduino.h>
#define ADC_UNITS 1024
#define ADC_REF_VOLTAGE 3.3
#define ADC_SCALE_FACTOR 2
int pinBatt = A6;
void setup() {
// put your setup code here, to run once:
pinMode(pinBatt, INPUT);
Serial.begin(57600);
Serial.println("Module 3-3 Lab 3a: Battery Status");
cmd.add("batt", cmdBatt);
}
void loop() {
cmd.poll();
}
Here's some further info on #include libraries, #define constants and global variables if you're interested
# include
https://www.arduino.cc/reference/en/language/structure/further-syntax/include/
#define
https://www.arduino.cc/reference/en/language/structure/further-syntax/define/
Global variables and scope
https://www.arduino.cc/reference/en/language/variables/variable-scope-qualifiers/scope/
hope that helps!
Jacinta
22 December 2020 3:09am
Ah yes! Rookie mistake and soon as I saw your response I remembered the #include #define needed to be outside the setup.
Thank you!
SD Cards and Reliability
10 November 2020 1:02pm
18 December 2020 5:15pm
Just saw this in the digest listing -- I'd hit the same problem with the WiFi SD cards being power hungry so we're developing something ourselves with Bluetooth, WIFI and LoRa. Currently pursuing funding to be able to develop it faster, but the intention is to opensource -- so would love to colaborate if anyone has interest/input/use cases? My PhD is in low power wireless sensor networks so nice to have a project it can actually be useful for. Providing we can get funding we'll have some 'free to you' prototypes for field testing.
19 December 2020 9:29pm
Hi @openlx
Sounds very interesting and love to hear more. So would your system work as a replacement SD card, or work with an existing card/card holder. I think there's a lot of potential for any conservation technology that uses SD cards, including camera traps. And can I ask what sort of ballpark levels of funding are we talking?
Cheers,
Rob
20 December 2020 5:36pm
It would slot in to replace the usual SD storage card, with power, controls and antenna etc. hanging off thin wires -- the idea being to fit as many existing products as possible. Looking to raise about £10k for the proof of concept and then same again for certification and initial run.
Code location online?
16 December 2020 6:33pm
3 March 2021 10:34am
Hi Phil.
I checked and there's no problem with your code. It looks like it's a hardware issue. I'll be sending out a replacement board to you. Can you confirm your address via DM, just so that I can make sure I don't send it to the wrong place?
Thanks
Akiba